A 301 redirect is a way to alert search engines that the old URL of your page or post has been changed. This helps prevent confusion in SERPs and can help you maintain rankings on search engines.
You can also use a redirect as a way of shortening urls so that they’re easier to remember.
In this post, I will show you how to add a 301 redirect in WordPress without using a plugin.
If you do use a plugin – then I would suggest using Rank Math or Redirection by John Godley.
But without a plugin? Follow the steps below.
In the examples below, I will use the following examples:
Old URL : https://somedomain.com/old-post/
New URL : https://somedomain.com/new-post/
Option 1 – Add a redirect via your hosting provider.
Theres a good chance that your hosting provider will allow you to add a redirect within your hosting panel. I will highlight some various hosting panel software below.
Redirect a URL in cPanel
- Login to your hosting provider.
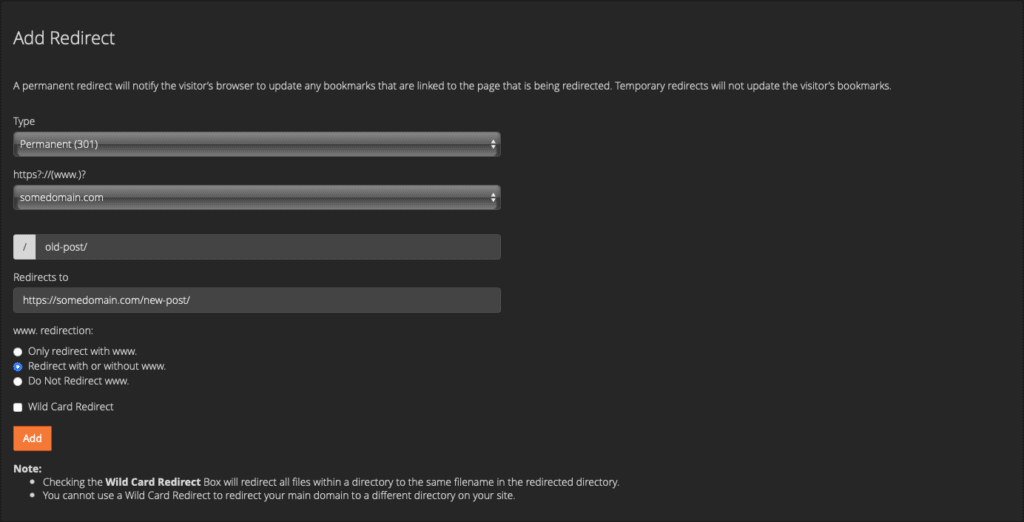
- Under the Domains section, click on ‘Redirects’.
- If the redirect is permanent, then choose 301 option type.
- Select the domain in the next drop down
- and in the field below, type the old url slug, in this example ‘old-post’
- In the Redirects to field, put the full url where you want that page or post redirected to. For example https://somedomain.com/new-post/
- Make sure redirect with or without www is selected.
See the screenshot below on adding a 301 redirect in cPanel.

Redirect a URL in Plesk
- Login to your hosting provider
- Go to Websites and domains
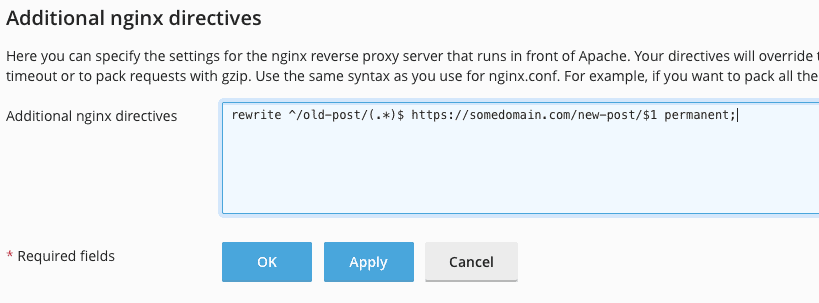
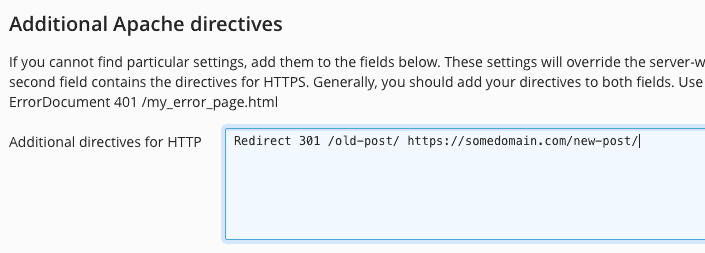
- Select Apache and Nginx settings
- If you’re using Nginx add the following to ‘Additional directives’
rewrite ^/old-post/(.*)$ https://somedomain.com/new-post/$1 permanent;- If you’re using Apache then add the following to Additional Apache directives
Redirect 301 /old-post/ https://somedomain.com/new-post/- Click Apply and test.
See the screenshots below on adding a 301 redirect in Plesk


Redirect a URL 20i’s StackCP
- Login to your Hosting Provider
- Go to Web Tools > Redirects
- Under Create a Website redirect, fill in the following fields;
- Select your domain
- Redirect From /old-post/
- Redirect To https://somedomain.com/new-post/
- Type – 301 Permanent Redirect
- Click Create Redirect
See screenshot below on creating a redirect in 20i’s panel.

Redirect a URL in DirectAdmin
- Login to your DirectAdmin panel
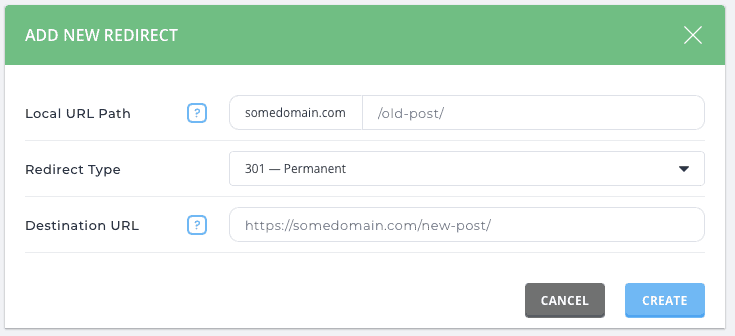
- Go to Account Manager > Site Redirection
- Click Create new Redirect
- In Local URL Path add old-post/
- Redirect Type – 301-Permanent
- Destination URL https://somedomain.com/new-post/
- Click Create
See screenshot below on creating a redirect with DirectAdmin

Pros and Cons of adding a redirect in your hosting provider’s Control Panel
Pros
- Redirects are fast as they get processed at the server level
- Doesn’t just apply to WordPress – can be used on any website
Cons
- Can be more cumbersome to manage
- If you move away from your hosting provider, you will need to setup your redirects again at your new provider
- You need to have a backup of the redirects
- Not great for adding redirects in bulk
Option 2 – Add a redirect via website config files (.htaccess and nginx.conf)
Add redirect using Apache .htaccess
If your hosting is using Apache or Lightspeed, then the .htaccess file is a great place to add some redirects. Always perform a full backup of any existing .htaccess files in case something goes wrong.
You can access the .htaccess file either by FTP, SFTP, or using your hosting’s file browser / editor.
The .htaccess file is in the root of your WordPress installation.
The standard WordPress .htaccess file looks like this:
# BEGIN WordPress

RewriteEngine On
RewriteRule .* - [E=HTTP_AUTHORIZATION:%{HTTP:Authorization}]
RewriteBase /
RewriteRule ^index\.php$ - [L]
RewriteCond %{REQUEST_FILENAME} !-f
RewriteCond %{REQUEST_FILENAME} !-d
RewriteRule . /index.php [L]

# END WordPress
You can read more about .htaccess on WordPress.org
- Open the .htaccess file in any text editor and add the following code:
Redirect 301 /old-post /new-post- So your .htaccess should now look like this:
# BEGIN WordPress

RewriteEngine On
RewriteRule .* - [E=HTTP_AUTHORIZATION:%{HTTP:Authorization}]
RewriteBase /
RewriteRule ^index\.php$ - [L]
RewriteCond %{REQUEST_FILENAME} !-f
RewriteCond %{REQUEST_FILENAME} !-d
RewriteRule . /index.php [L]

# END WordPress

Redirect 301 /old-post /new-post- Remember to keep your .htaccess tidy and easy to read.
- Save your file
- If all is working, ensure you have a good backup and you can delete your original backup.
Add redirect using nginx.conf file
Your hosting may be using nginx, so you should normally see a nginx.conf file in the root of your WordPress installation.
You can access the nginx.conf file either by FTP, SFTP, or using your hosting’s file browser / editor.
A great resource for WordPress nginx configuration
- To add a redirect in your nginx.conf file add the following:
rewrite ^/old-post$ https://somedomain.com/new-post permanent;- Remember to keep configuration files easy to read
- Keep a backup
- Save your work
Pros and Cons of adding a redirect in configuration files
Pros
- Redirects are fast as they get processed at the server level
- Doesn’t just apply to WordPress – can be used on any website
- A great way of adding redirects in bulk
- Should be included in backups – but make sure!
- Will work with most hosting providers should you move hosts (if they use the same technology (Apache / nginx)
Cons
- Can be cumbersome to manage (Keep your files clean!)
Conclusion
If you’re looking for a safe and effective way to redirect your site visitors, the above steps will help. By using the power of 301 redirects, you can make sure that all links on your website are working correctly.
